Showing posts with label Blogger. Show all posts

Detecting and Guarding Against Plagiarism on the Internet


Plagiarism statistics reveal that 54% school students admitted to have plagiarized content from the Internet and 74% students accepted cheating at least once in an academic year, in a survey by Education Week. About 66% of the students from reputed American universities have plagiarized content from the Internet, which is a huge ocean of information. So, copying content written by someone and passing it off as your own has become very easy. In this competitive world, people go to any extent to gain publicity and earn quick money. 

Detecting and Guarding Against Plagiarism on the Internet

Plagiarism on the Internet is on the rise, because there is a lot of negligence by the people. Even educated people are cheated quite easily by fraudsters. Even if a certain person is dragged to court for illegal stealing of information, the damage done by him/her to the original writer, in terms of money and reputation is irreparable. Preventing plagiarism is a challenge. Enforcing strict penalties against it, of all kinds, has become the need of the hour.

How to Guard Against Plagiarism?

Plagiarism can be intentional, as well as unintentional. It is necessary to educate students about it, right from school days. It is an evil which hampers the ability to think. It destroys the creativity in an individual. To prevent it, we can limit our sources of collecting information. 

The work submitted should be thoroughly checked for plagiarism. At times, the writer should be asked questions related to the article, to test the depth of his knowledge. The writer will be able to answer the questions, only if his content is original. Hundreds of cases are filed everyday, for violating the Copyright Act. Many genuine and talented authors have to suffer because of plagiarism, as someone else who is no way related to penning the content, walks away with the money and honor.

Detecting it on the Internet

Detecting plagiarism means finding the words or lines which have been plagiarized. We can detect it, either by using a computer software or manually. Detecting it manually can be very tedious and at times, almost impossible, if the document to be checked is extensive. Many websites on the Internet provide online tools to detect it in all sorts of content. 

The Essay Verification Engine (EVE) is widely used to detect plagiarized prose content. The detector uses widely and most used search engines like Google, Yahoo, and Altavista, to compare the submitted content to the original content. The detector splits the text document to be verified into many strings of equal lengths. The data is then fed into the search engines. The final report is generated after the scanning is over. The writer is asked to repeat the article, if the percentage of plagiarism is more than 20%. The detector is very effective because 95% of plagiarized material is likely to be found in most of the cases. The scanning process can be completed within a few minutes. 

It is the duty of alert Internet users to take action against copyright violators, who are involved in plagiarism on the Internet. If proved guilty in the court of law, copyright violators may be sentenced to imprisonment or fined, depending upon the seriousness of the offense.

Essential Blogging Tips to Increase Your Page views


Blogging is the most popular ways to earn money online and a lot of people have been dedicated to promoting their own blog and look forward to drive more visitors in various ways such as social media or blog commenting. However, it is not quite easy to compete with other blogs and make ours stand out among these fully established blogs. But there are some ways that you might be interested in or may get your attention to increase your blog page views.

  • Create and establish your own Social Media Network – Creating social media pages on various social media platforms can potentially increase your visitors. Moreover, if you have a lot of online friends that you are continuously and actively communicating with. Imagine of 50% of your online friends visited your newly posted content on your blog and 25% of them shared it to their pages. This could potentially make your post appear on different websites with the help of your online friends
Essential Blogging Tips

  • Follow influential People in your industry – Following influential people in your industry could also make huge difference. Assuming that you are in SEO industry and you know some huge and well-known individuals who have gained credibility and reputation online like Matt Cutts and Randy Frishkin. Following these two celebrities could give your website a huge amount of traffic and if or when for some reason, they repost, retweet or leave a comment on one of your blog posts; this would make your blog stand out because being noticed by these celebrities will give a rewarding impact to your blog.
  • Interlinking of related pages – One good ways of increasing your page views is to interlink your pages based on its connection to each other. The main purpose of interlinking is to support each other relating to their content as additional information. Imagine if you have a popular post which receives a lot of page views and you have pages linked to that post, there is a huge chance that your linked pages will be visited as well by your visitors.
  • Build Trust Factor – Most importantly, in order to gain more page views, is to necessarily that our content is reliable, informative and will not drive away the attention of our readers by diverting the flow of your content to different ways. It is necessary that we should always be direct to the point and has a detailed explanation of our content. By building trust factor, there is a higher opportunity that your new visitors will return and read your newest posts that might help them with their queries.

Blogging is an exciting way to share our knowledge to everyone and to help them gain new ideas or build their own strategies based on a blog post that we posted. So it is extremely important that we only post high quality content that will be useful for other people. Also, blogging has been the most essential part of SEO and a lot of people have been focusing on guest blogging as a part of their SEO strategies to build online brand.

Tips For Blogging - Make Money Blogging


Blogging is the most popular paintings-from-domestic job opportunity out today. Millions of people try and blog every yr and regardless of what your reasons for wanting to begin a weblog, it allows if you apprehend how to build and finally operate your website online.You want to Make Money Blogging. Here are some exquisite blogging pointers you can use to assist you.

Tips For Blogging


Tips For Blogging:

  • Create a blogroll. A blogroll is a list of different blogs on your niche that you discover treasured. Creating the sort of list increases your blog's cost to readers, as they will be able to locate content material that they couldn't discover in your blog. In case you use your blog for advertising, a blogroll may also boom your credibility within the marketplace.

  • Attempt to be available to your readers at all times. Grow to be a habit that your readers do not want to do without. While you're able to connect with your readers often, they'll anticipate your presence. Take into account that other humans obtainable might be disappointed if you give up in your weblog.

  • Because blogs are written on a more private level, you should keep away from writing in formal tones. This can make it simpler for the reader to relate to you on a personal stage. This may keep your readers coming again later on to read extra of the blogs you write.

  • When running a weblog, ensure which you ask open-ended questions. One of the best methods of having humans to reply for your posts is absolutely soliciting for it. Allow your readers answer your questions by way of inviting them to respond with a comment. This makes them feel greater engaged, which increases the odds that they'll stick with you.

  • Set goals in your weblog. Having set desires which you need to achieve will cross alongside manner toward increasing your productivity. Determine what number of posts you want to make in a given week. Decide what your cognizance is going to be and what keywords you're going to be focused on. Taking the time to work out your dreams, will maintain you on cognizance and blogging productively.

  • Hold your blog posts quick and sweet. Complete coverage isn't any doubt crucial, however writing a 2000-word weblog publish is a good way to ensure that it is in no way study to the give up. Weblog readers are much less involved about mundane details and different useless facts. Give them the content they want and, unless your web page is poetic or otherwise excessive brow in nature, no longer literary prose.

Build A Website

Everyone has long known that the Internet can earn real money. And experience shows that the best solution is to create your own website.But ordinary users is quite difficult to imagine  d, lastan but  how to create a website from scratch, and that in the future he would bring a good income. Let's try to figure it out as much as possible. create a website, build a website
Choice of themes create a website, build a website
Perhaps the most important factor in creating a website is a topic (the content i least, demand for the company  the future) that will be on your site. Subjects have to be interesting to you personally, Because otherwise, your site will not last long afloat, either because you yourself get bored watching and boring affair, or else to your site simply will not go. There are also important high uniqueness of the text, as any plagiarism is strictly punished permanent ban. create a website, build a website
Where to start? create a website, build a website
How to create a website from scratch
This question in the first place interested in almost all users who had a great desire to have their own web page. But a clear answer nobody will give you, because everyone has their own strategy for the opening of this site.Ideal - when you're doing exclusively by themselves, without the help of experts in this field. However, this is rarely the case, since you need to know at least the basic programming language, be able to write unique text, perform a beautiful design and, of course, to optimize your site and promote it. create a website, build a website
Books or articles on the Internet create a website, build a website
A great opportunity to learn how to build your website step by step and qualitatively. The advantages include the possibility of re-reading books or articles on the Internet as many times as you like.
However, there are disadvantages. In the case of a book, to understand all the aspects and nuances of site building - you need to stock up on a remarkable patience. Most likely you have it will take quite a long time, and you can not specify the unclear point, if any.In addition, not all people are willing to do anything to read, that is simply do not like to do it. Digging on the internet, too, sooner or later get tired, so this method of obtaining the necessary information is quite doubtful. create a website, build a website
Trainings create a website, build a website
You can sign up for various online conferences that deal with your question, or else undergo special training on this subject. On the one hand, they provide high performance in just a few hours of study, and on the other - not everyone will find the right amount, as for it take a lot of money.In addition, if for the entire course, you still do not understand how to create a website from scratch, you will simply lose your money can not be recovered. Of course, if hard to outline the knowledge and to listen carefully to your mentor, you will achieve good results. But, as you've probably guessed, there are other ways, implying free acquisition of knowledge and in the quickest time possible. create a website, build a website
Other ways to create a website, build a website
Yes, it is quite possible, if you personally know people who know at a professional level in the creation of the site and have a good relationship with this person. If these do not exist, I will try to briefly describe the essence and lead step by step instructions.In fact, in the creation of a web page is easy. If you registered with any social networks, then you do not need to worry. Simply sign up for any hosting (template) and do regular updating it.It would be better if the hosting will be paid, as it come more visitors. However, now is not it. These templates on the Internet a great multitude, which you can find in any search engine. That's basically all your initial website is ready.It remains only to fill it with relevant content and optimize, as it is unlikely your goal was just stupid to learn how to build a website from scratch and shout three times, "Hurrah!" (On a boring design you need to write something about yourself, in order to evaluate your site from visitors who initially will be your friends and acquaintances. If you have the talent of writing articles, then you are very lucky, you will not have to hire copywriters or re writer .In fact, there is not much knowledge needed, it is only necessary to competently express their thoughts in writing. In the end, the person who has decided to create a site is unlikely to be intellectually primitive and mean. But with the web design will have to sweat, and it is better to hire a specialist web designers who will do the job efficiently and quickly.Yes, it does require some financial investment, but with the successful creation and optimizing your site, you should definitely it will pay off. And finally, the most important part - to promote your site and make it accessible to search engines. Delve into this topic, we will not, as this is the hardest part, without which the very creation of a site from scratch does not make any sense. create a website, build a website
conclusion As I promised, I will give step by step instructions on Web design from start to finish, which we sum up in this article. So there you go. create a website, build a website
  • Come up with a theme of interest to you and demanded to society
  • Choosing a domain name and reliable hosting
  • We fill site information (content) create a website, build a website
  • Do not forget to keep it updated
  • Hire a web designer or learn it yourself create a website, build a website
  • Getting to the optimization and promotion of your site
  • We are waiting for the guests and get a decent profit, and the mood
That is, in principle, that's all. If you have the desire and perseverance, about six months your site will become very popular in the world wide web, and most importantly - demand for your guests (which is quite a lot) and bringing a good profit. create a website, build a website

How To Get More Traffic To Your Blog


Blogging is not only the game of receiving traffic. We have to target each and every visitor to convert them into readers. Blog page views are also as important as traffic. We have to focus on the strategies that work on increase blog page views. If a visitor land on your blog then your aim should be to present a nifty and well detailed content so that the visitor keen to stay at your blog for longer time to read more content provided by you. It will not only increase your blog traffic but also help your blog to rank well in search engines because visitor’s visit time is also an important ranking factor. Today I come with 5 best tips that really perform well in the case of increase in blog page views. how to get more traffic to your blog
Increase Blog Pageviews

Show Related Posts  how to get more traffic to your blog

Whenever you write new post for your blog, always remember to tag it with a keyword rich label before publishing it. Then use related posts widget to show similar posts under that label below every post. It will not only increase your blog page views but also reduce your blog bounce rate. 

Highlight Popular Posts  how to get more traffic to your blog

Put popular posts widget into blog sidebar to show most trendy posts of your blog. By doing so, you provide one more option to the visitors to click the link. Once they attract towards the popular posts they will surely keen to read them. Hence more blog page views that automatically increase your blog traffic.

Deep Linking  how to get more traffic to your blog

You may already know the benefits of internal linking and deep linking is same as internal linking but it has some more benefits then it. Suppose you have two posts in your blog Post A and Post B then you can interlink Post A with Post B. But in case of deep linking you need to link Post A with that post which is same with that topic means which covers topic of Post A in depth.  how to get more traffic to your blog

Split Lengthy Posts  how to get more traffic to your blog

Generating quality content for blog is must for success. You should make a plan to publish at least a post with details and well explanation in a week.  Once you write a lengthy and detailed post, the tricky part comes in action. You should be tricky to publish that post. Always split these types of posts into parts like:
You can divide 20 tips into two posts means 10 tips for each post. Always publish lengthy content into pieces and link them to each other. By doing so, you will get below benefits:
  1. Increase number of published posts in your blog.
  2. Increase blog page views.
  3. Increase traffic to your blog with the help of each part.
  4. Reduce blog bounce rate.
  5. Chances to get all parts rank with targeted keyword. Hence you achieve search engine domination that increases your blog CTR.

Use Search Box  how to get more traffic to your blog

If your readers finish reading the article and want more relevant information and don’t get it then surely they will go back to another blog for more information. To resolve this issue always add a search box in your blog like Google Custom Search Box. This is the best widget that shows more relevant posts than other search boxes.  how to get more traffic to your blog

Blogger Tips


Blogs created on blogger are by default open for all readers so that they can come and read any blog according to their choice. But sometime we need to make our blog private so that nobody can read it without our permission like in case of private blog where we share our family photos for family members only or a blog for friends so that only they can read that blog. The reason can be different for different bloggers to make their blogger blog private and restricted for specific readers.
Blogger provides a weird tool by which we can easily restrict our blog for public readers. They will not be able to access our site. Only blog admins and authors can access the blog if they are log in to their Google account. Let's start the tutorial.

Make Private Blog in Blogger

Log in to Blogger and go to Settings >> Basics >> Blog readers.

blogger basic settings
Under the blog readers section click on edit link where you will find below three options.
  1. Anybody: This option is selected by default means your blog is open for public readers. Anyone can access your blog. blog layout, future blog, blog sites for beginners, blogger home ,expert blog 
  2. Only Blog Authors: If you choose this option then your blog will become restricted for public users. Only blog admin and blog authors can read the blog. But they have to log in to their Google Account to access the blog. blog layout, future blog, blog sites for beginners, blogger home ,expert blog 
  3. Only These Readers: This is the last option which provides the facility to open your blog for particular readers. You can enter the list of their email ids so that they can receive an invitation to become your blog readers. 
Choose any one from these three options and click on "Save changes" button.
blog layout, future blog, blog sites for beginners, blogger home ,expert blog 

How To Add Social Media Icons to Blogger Header

social media icons, facebook icons, social media icons for bloggerThis tutorial will help you to add social media icons in the top right corner of the page which could increases the likelihood that readers can follow through the various social networks. There are several ways to do this, like adding a new widget section to the blog header but now, we'll do it using an unordered list that uses icons of Facebook, Twitter, Google+ and blog feed, and as a bonus, the icons will rotate when you hover over them.


Adding Social Media Icons to Blogger Header

Step 1. From your Blogger dashboard, go to Template and click on the Edit HTML button:

Show Recent Posts

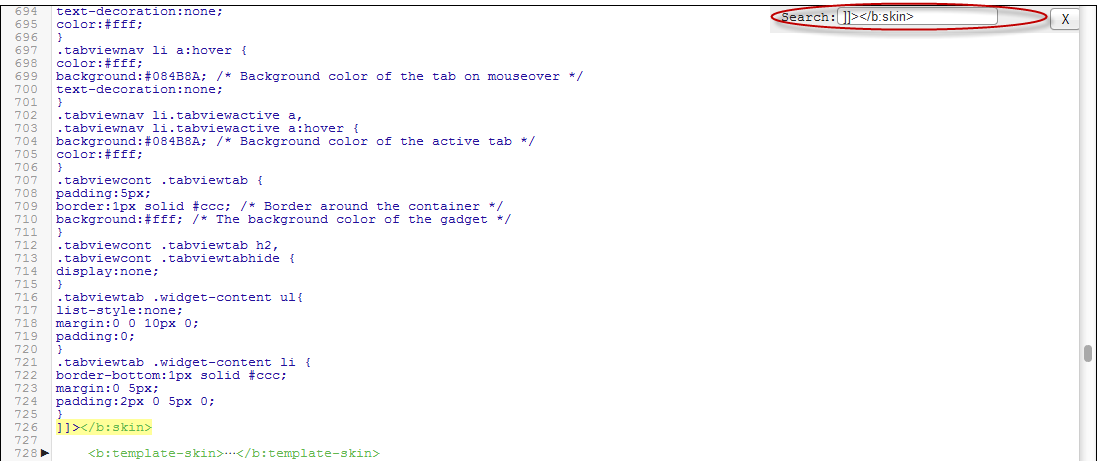
Step 2. To expand the style, click on the small arrow on the left of <b:skin>...</b:skin> (screenshot 1), then click anywhere inside the code area to search (using CTRL + F) for the ]]></b:skin> tag (screenshot 2) and add this code just above it:

 /* Social icons for Blogger
----------------------------------------------- */

#social-icons {
margin-bottom:-30px;
height:50px;
width:100%;
clear:both;
z-index: 2;
position: relative;
}
.social-media-icons {
display:table
}
.social-media-icons ul {
text-align:right;
padding:5px 5px 0 0
list-style-image:none;
list-style-position:outside;
list-style-type:none;
}
.social-media-icons ul {
margin-bottom:0;
padding:0;
float:right;
}
.social-media-icons li.media_icon {
margin-left:6px;
padding-left:0 !important;
background:none !important;
display:inline;
float:left;
}
.social-media-icons li:hover {
-moz-transform: rotate(360deg);
-webkit-transform: rotate(360deg);
-o-transform: rotate(360deg);
transform: rotate(-360deg);
-moz-transition: all 0.5s ease-in-out;
-webkit-transition: all 0.5s ease-in-out;
-o-transition: all 0.5s ease-in-out;
-ms-transition: all 0.5s ease-in-out;
transition: all 0.5s ease-in-out;
}

Screenshot 1:


Screenshot 2:


Step 3. Now search for this line

<b:section class='header' id='header' maxwidgets='1' showaddelement='no'>

Step 4. And just above it, add this code:

<div class='social-media-icons' id='social-icons'>
<ul>

<li class='media_icon'><a href='http://facebook.com/username'><img border='0' src='https://blogger.googleusercontent.com/img/b/R29vZ2xl/AVvXsEh6Y3HIZbchj7YYPeWLp2dMAZ7D6L9ITvtKctM8R0nHbX2FkUSq-B9ce-t8hEB0ecXUr7gzC2Ug99gX9O-HgRhCj04W2iV9XRvgae-hy98jpF8Nd8TyYGu1m1l7ONtGubgN7oF3674BQxk/s1600/Facebook.png'/></a></li>

<li class='media_icon'><a href='http://twitter.com/#!/username'><img border='0' src='https://blogger.googleusercontent.com/img/b/R29vZ2xl/AVvXsEhvUV5yM1-YsK1ZGEP7LeuVejPZT_SRcAYNLoWUMUkxDPww78CxWLEGqNitON4zacSbhDkFThqfH_T1hrTKA3LbdQn_KOj4WoPQJtFa1ttCLBu32_FRSxwjWygJK1ndqAHf8s9f6QcjiLg/s1600/Twitter.png'/></a></li>

<li class='media_icon'><a href='https://plus.google.com/XXXXXXXXXXXXXXXXXX/about'><img border='0' src='https://blogger.googleusercontent.com/img/b/R29vZ2xl/AVvXsEioK4yQ1LpfxDJ8gA9EAI7wbopCCNgiCtXdhhYigVxFdlVnwHWZhcTZH7azmnweoO1SjvpWxrO7iFyWpq1UXukv-98o6L2U9MnigjL1TzDvEC-vVWRxiTm1cKHYokjjxamapwVreihTXcY/s1600/googleplus.png'/></a></li>

<li class='media_icon'><a href='http://name-of-your-blog.com/feeds/posts/default'><img border='0' src='https://blogger.googleusercontent.com/img/b/R29vZ2xl/AVvXsEiTPTctkt3FTBOTe09Dt3RYPMk3v_CojDb5sruOARLj4EfX_B7k9zyMjguAzV9fck7bR-IpJ7mdlaS30I7bYGKulFNKuhq2lQ7e1VWhnjFmDM7hCmkZwqhCUd8qIpTsR9SfHti701fvY9k/s1600/RSS.png'/></a></li>

</ul></div>

Customization

- Change what's in red with your usernames and id: the first is your Facebook username, the second is that of Twitter, in the third you should change the X by the ID of your Google+ profile and in the fourth you will put the name of your blog.
- To change the icons, just replace the urls in blue with the ones of your images.
- You can add more icons if you want, you just have to add before </ul></div> a line like this for each extra icon you want:

<li class='media_icon'><a href='Link URL'><img border='0' src='Image URL'/></a></li>

Step 5. Finally, Save the Template to apply the changes.
The effect is done with CSS3, so this effect will not work in older browsers.

Fading Box With Newer/Older Posts Links and Titles for Blogger

The navigation links are those that appear at the bottom of the page that says "Older Posts", "Newer Posts" and "Home" and help us to move through the blog posts. This tutorial will show you how to change the word "Older Posts" and "Newest Posts" for post titles and make these to appear in a box "fading" when you scroll down the page.
blogger gadgets, navigation for blogger

when you scroll down, the navigation links will appear showing the post titles for the older/newer entries.

This way to display the navigation links will be seen only in individual entries, while those on the homepage and other parts of the blog will still be displayed as usual.

How to Add Navigation Box with Newer & Older Posts on Blogger

Step 1. From your Blogger Dashboard, go to Template > Edit HTML, click anywhere inside the code area and search - using CTRL + F - for this line:

<b:include name='nextprev'/>

Screenshot:
Fading Box

Step 2. REPLACE the code above with this one:

<b:if cond='data:blog.pageType != &quot;item&quot;'>
<b:include name='nextprev'/>
</b:if>
<b:if cond='data:blog.pageType == &quot;item&quot;'>
<div id='blog-pager-box'>
<h4>Other posts published:</h4>
<b:include name='nextprev'/>
</div>
</b:if>

Note: you can change the "Other posts published" title with your own

Step 3. Now add just above </head> the following code:

<b:if cond='data:blog.pageType == &quot;item&quot;'>
<script src='http://ajax.googleapis.com/ajax/libs/jquery/1.8.2/jquery.min.js' type='text/javascript'/>
<script>
// <![CDATA[
$(function() {
$('#blog-pager-box').toggle()
.css({
width: '520px',
height: '150px',
position: 'fixed',
padding: '1em',
bottom: 0,
right: 0,
background: 'url(https://blogger.googleusercontent.com/img/b/R29vZ2xl/AVvXsEhSGHOPhqCCttxHU2jZLsA1u853NSKyfrh_q7DOOq4UhI8k9ZxWh53zb26pKDl9BFTufXYaOVU_JRw8wFjGSfMf5IEiergpegK6IXaFZdMBr6sDj66AiKZUsGOcaTF4pfBVvWSb7TaeIhJQ/s1600/paper.jpg)'
});

$(window).scroll(function() {
if($(this).scrollTop() > 100) {
$('#blog-pager-box').fadeIn();
} else {
$('#blog-pager-box').fadeOut();
}
});
});
$(document).ready(function(){
var newerLink = $("a.blog-pager-newer-link").attr("href");
$("a.blog-pager-newer-link").load(newerLink+" .post-title:first", function() {
var newerLinkTitle = $("a.blog-pager-newer-link:first").text();
$(".blog-pager-newer-link").html("<div>Newer Posts:</div>" + newerLinkTitle);
});
var olderLink = $("a.blog-pager-older-link").attr("href");
$("a.blog-pager-older-link").load(olderLink+" .post-title:first", function() {
var olderLinkTitle = $("a.blog-pager-older-link").text();
$(".blog-pager-older-link").html("<div>Older Posts:</div>" + olderLinkTitle);
});
});
// ]]>
</script>

<style type='text/css'>
<!--
#blog-pager-box {
box-shadow: 0 0 3px #AEAEAE;
z-index:9;
}

#blog-pager-box h4 {
margin:0;
padding:0;
color:#4898B9; /* Widget's title color */
font-size:16px; /* Title font size */
}

#blog-pager-newer-link {float:left;clear:both;line-height:30px;}
#blog-pager-older-link {float:left;clear:both;line-height:30px;}
.home-link {display:none;}
.blog-pager-older-link, .blog-pager-newer-link {
background-color: transparent !important;
background-image: none !important;
border:0 !important;
color: #4B4B4B !important; /* Color of the links */
float: left;
width: 500px;
clear:both;
}

a.blog-pager-older-link:hover, a.blog-pager-newer-link:hover {
text-decoration:none !important;
}
 
a.blog-pager-newer-link:before {
content: url(https://blogger.googleusercontent.com/img/b/R29vZ2xl/AVvXsEjam3nBEy-WUfvJe9cVEVtc079x4USlJm5lVL7VGq_3rw_dTnAG6r7RPHFhTDWNXgXOA0JhtsbiYvgrfIFmV7x3YJ3Nm2f8rRGL4OArHiXKamoBkW3aixQ0egX4B-4r64XoRLsvZrG4uoQ/s1600/back.png);
float:left;
}
a.blog-pager-older-link:before {
content: url(https://blogger.googleusercontent.com/img/b/R29vZ2xl/AVvXsEi_UaXF2yywg2AUJ1dWiSVW88Cn-E91uuWQRfh-nP3S1dRn6XbgrUpiM1GuVS09JSklkK4yr0uS5oFCXcbjMQuDz5RzklTYoaKNFkBmtl-2XAg_x4i3xdlj3OlgRm62vDgKWuAvSbP8M3Q/s1600/forward.png);
float:left;
}
#blog-pager {
width:500px;
background-color: transparent !important;
background-image: none !important;
border:0 !important;
text-align:left;
}
 
#blog-pager div {
color:#0577AB; /* Color for the "Newer Posts" and "Older Posts" text */
font-weight:bold;
margin-bottom: -5px;
}
a#blog-pager div:hover {
text-decoration:none !important;
color:#4898B9; /* Color for the "Newer Posts" and "Older Posts" text */
}
-->
</style>
</b:if>

Note that this gadget uses jQuery, so try to have only one version.


Customization:


- There are three URLs in blue, the first is the paper background image for the box, the other two are the icons that correspond to the arrows. You can replace these with your own.
- In green you can see where to change the text colors.
- The red number is the distance in pixels that activates the gadget, this means that the box will appear when you scroll down the 100px. You can use a higher value if your posts are usually long and therefore the "height" of the scroll is greater.
Step 4. Now, Save the Template and that's it!

You can also change the "Older Posts" and "Newer Posts" links with posts titles or images.

New Blogger Widget: Contact form - Change Style & Install in a Static Page

Just a few days ago, Blogger introduced a new widget. It is about a contact form that you can add to your blog easily. It is very basic, because - at least for now, does not permit incorporating files or send anything other than plain text.

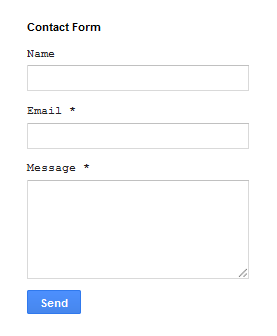
The contact form for Blogger has the following features:
  • Field for the user name
  • Field for email
  • Field for the message (textarea)
  • Submit Button
Screenshot
contact form, blogger gadgets, static page
 The design is simple and the text colors inherit the section where you add it. At the moment, this widget has no configuration options and is not available for dynamic views.

How to Add Contact Form to Blogger

To add it to your blog, just select the Layout tab, then click on Add a gadget in the section you want to show, for example, in the sidebar. Then, select the More gadgets tab and add the Contact Form gadget.


blogger gadgets, blogger widgets, contact form

Styling Contact Form


As the background is transparent, the form will integrate well, aesthetically speaking, but nevertheless it is easy to modify using Style Sheets (CSS) to the appropriate selectors. Here's an example:

/* Contact Form Container */
.contact-form-widget {
width: 500px;
max-width: 100%;
margin: 0 auto;
padding: 10px;
background: #F8F8F8;
color: #000;
border: 1px solid #C1C1C1;
box-shadow: 0 1px 4px rgba(0, 0, 0, 0.25);
border-radius: 10px;
}

/* Fields and submit button */
.contact-form-name, .contact-form-email, .contact-form-email-message {
width: 100%;
max-width: 100%;
margin-bottom: 10px;
}

/* Submit button style */
.contact-form-button-submit {
border-color: #C1C1C1;
background: #E3E3E3;
color: #585858;
width: 20%;
max-width: 20%;
margin-bottom: 10px;
}

/* Submit button on mouseover */
.contact-form-button-submit:hover{
background: #4C8EF9;
color: #ffffff;
border: 1px solid #FAFAFA;
}

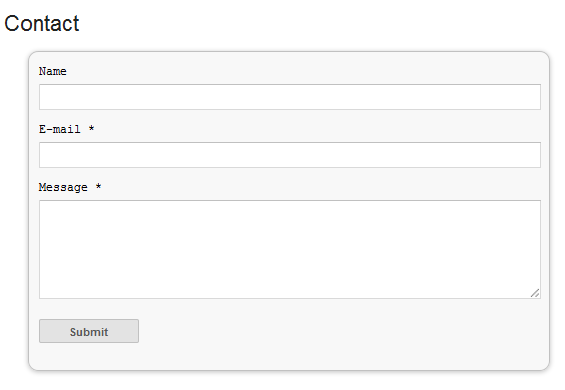
This is how it will look like after applying the style:
contact form, blogger gadgets, contact form for blogger

To add this style, go to Template > Edit HTML, click on the sideways arrow next to <b:skin>...</b:skin> and paste the code just above ]]></b:skin> (press CTRL + F to find it):

Contact form

How To Add Contact Form In A Static Page


First step is to add the Contact Form gadget (Layout) and second, to edit the template (Template > Edit HTML) to remove most of the gadget. You have to search for the id "ContactForm", expand the widget by clicking on the black arrow on the left (same with the includable) and then delete the part that I have colored in red (see below):
Contact form

Part to be removed:

  <b:widget id='ContactForm1' locked='false' title='Contact Form' type='ContactForm'>
    <b:includable id='main'>
  <b:if cond='data:title != &quot;&quot;'>
    <h2 class='title'><data:title/></h2>
  </b:if>
  <div class='contact-form-widget'>
    <div class='form'>
      <form name='contact-form'>
        <p/>
        <data:contactFormNameMsg/>
        <br/>
        <input class='contact-form-name' expr:id='data:widget.instanceId + &quot;_contact-form-name&quot;' name='name' size='30' type='text' value=''/>
        <p/>
        <data:contactFormEmailMsg/> <span style='font-weight: bolder;'>*</span>
        <br/>
        <input class='contact-form-email' expr:id='data:widget.instanceId + &quot;_contact-form-email&quot;' name='email' size='30' type='text' value=''/>
        <p/>
        <data:contactFormMessageMsg/> <span style='font-weight: bolder;'>*</span>
        <br/>
        <textarea class='contact-form-email-message' cols='25' expr:id='data:widget.instanceId + &quot;_contact-form-email-message&quot;' name='email-message' rows='5'/>
        <p/>
        <input class='contact-form-button contact-form-button-submit' expr:id='data:widget.instanceId + &quot;_contact-form-submit&quot;' expr:value='data:contactFormSendMsg' type='button'/>
        <p/>
        <div style='text-align: center; max-width: 222px; width: 100%'>
          <p class='contact-form-error-message' expr:id='data:widget.instanceId + &quot;_contact-form-error-message&quot;'/>
          <p class='contact-form-success-message' expr:id='data:widget.instanceId + &quot;_contact-form-success-message&quot;'/>
        </div>
      </form>
    </div>
  </div>
  <b:include name='quickedit'/>

</b:includable>
  </b:widget>

After you have saved the template, go to Pages and paste the following code into a new blank page with the title you want:

 <div class='widget ContactForm' id='ContactForm1'>
  <div class='contact-form-widget'>
    <div class='form'>
      <form name='contact-form'>
        <p>Name</p>
        <input class='contact-form-name' id='ContactForm1_contact-form-name' name='name' size='30' type='text' value=''/>
        <p>E-mail *</p>
        <input class='contact-form-email' id='ContactForm1_contact-form-email' name='email' size='30' type='text' value=''/>
        <p>Message *</p>
        <textarea class='contact-form-email-message' cols='25' id='ContactForm1_contact-form-email-message' name='email-message' rows='5'></textarea>
        <input class='contact-form-button contact-form-button-submit' id='ContactForm1_contact-form-submit' type='button' value='Submit'/>
        <p class='contact-form-error-message' id='ContactForm1_contact-form-error-message'></p>
        <p class='contact-form-success-message' id='ContactForm1_contact-form-success-message'></p>
      </form>
    </div>
  </div>
</div>

Messages will be sent to the same email that you have registered in Blogger.

How To Add A Tabbed Navigation Widget to Blogger

The tabviews are elements that allow us to group in a single container various gadgets and these can be selected via tabs.
Its main function is to save space on the blog to avoid scattered gadgets in the same category so you can group multiple gadgets into one. There are several methods for creating tabviews, some require jQuery, other MooTools, or any other script.
Navigation Widget
To add this widget to your blog, just follow the steps below:

Step 1. From your Blogger Dashboard, go to Template and click on the Edit HTML button

Step 2. Expand the style of the template, by clicking on the sideways arrow before <b:skin> ... </b:skin>

Tabbed Navigation Widget

Step 3. Search using CTRL + F for the following tag:

]]></b:skin>


Tabbed Navigation Widget


Step 4. Just above it, add the following code:

/* Tabview for Blogger
----------------------------------------------- */
.tabviewcont{
margin:15px 0;
padding:0;
clear:both;
}

.tabviewnav {
margin: 0 0 0 14px;
padding:3px 0; /* If you are using a Blogger Template change 0 with 15px */
font-size:12px; /* Font size of text inside tabs */
font-weight:bold;
}
.tabviewnav li {
list-style:none;
margin:0;
display:inline;
}
.tabviewnav li a {
padding:3px 6px;
margin-right:1px;
background:#F6F6F6; /* The background color of the tabs */
border-radius:5px 5px 0 0;
-moz-border-radius:5px 5px 0 0;
-webkit-border-radius:5px 5px 0 0;
text-decoration:none;
color:#222222;
}
.tabviewnav li a:hover {
color:#222222;
background:#EBEBEB; /* Background color of the tab on mouseover */
text-decoration:none;
}
.tabviewnav li.tabviewactive a,
.tabviewnav li.tabviewactive a:hover {
background:#EBEBEB; /* Background color of the active tab */
color:#222222;
}
.tabviewcont .tabviewtab {
padding:5px;
border:1px solid #EEEEEE; /* Border around the container */
background:#fff; /* The background color of the gadget */
}
.tabviewcont .tabviewtab h2,
.tabviewcont .tabviewtabhide {
display:none;
}
.tabviewtab .widget-content ul{
list-style:none;
margin:0 0 10px 0;
padding:0;
}
.tabviewtab .widget-content li {
border-bottom:1px solid #ccc;
margin:0 5px;
padding:2px 0 5px 0;
}

Step 5. Find the </head> tag and just above it, paste this script:

<script type='text/javascript'>
// Tabview for grouping gadgets

//<![CDATA[
document.write('<style type="text/css">.tabview{display:none;}<\/style>');function tabviewObj(argsObj){var arg;this.div=null;this.classMain="tabview";this.classMainLive="tabviewcont";this.classTab="tabviewtab";this.classTabDefault="tabviewtabdefault";this.classNav="tabviewnav";this.classTabHide="tabviewtabhide";this.classNavActive="tabviewactive";this.titleElements=['h2','h3','h4','h5','h6'];this.titleElementsStripHTML=true;this.removeTitle=true;this.addLinkId=false;this.linkIdFormat='<tabviewid>nav<tabnumberone>';for(arg in argsObj){this[arg]=argsObj[arg]}this.REclassMain=new RegExp('\\b'+this.classMain+'\\b','gi');this.REclassMainLive=new RegExp('\\b'+this.classMainLive+'\\b','gi');this.REclassTab=new RegExp('\\b'+this.classTab+'\\b','gi');this.REclassTabDefault=new RegExp('\\b'+this.classTabDefault+'\\b','gi');this.REclassTabHide=new RegExp('\\b'+this.classTabHide+'\\b','gi');this.tabs=new Array();if(this.div){this.init(this.div);this.div=null}}tabviewObj.prototype.init=function(e){var childNodes,i,i2,t,defaultTab=0,DOM_ul,DOM_li,DOM_a,aId,headingElement;if(!document.getElementsByTagName){return false}if(e.id){this.id=e.id}this.tabs.length=0;childNodes=e.childNodes;for(i=0;i<childNodes.length;i++){if(childNodes[i].className&&childNodes[i].className.match(this.REclassTab)){t=new Object();t.div=childNodes[i];this.tabs[this.tabs.length]=t;if(childNodes[i].className.match(this.REclassTabDefault)){defaultTab=this.tabs.length-1}}}DOM_ul=document.createElement("ul");DOM_ul.className=this.classNav;for(i=0;i<this.tabs.length;i++){t=this.tabs[i];t.headingText=t.div.title;if(this.removeTitle){t.div.title=''}if(!t.headingText){for(i2=0;i2<this.titleElements.length;i2++){headingElement=t.div.getElementsByTagName(this.titleElements[i2])[0];if(headingElement){t.headingText=headingElement.innerHTML;if(this.titleElementsStripHTML){t.headingText.replace(/<br>/gi," ");t.headingText=t.headingText.replace(/<[^>]+>/g,"")}break}}}if(!t.headingText){t.headingText=i+1}DOM_li=document.createElement("li");t.li=DOM_li;DOM_a=document.createElement("a");DOM_a.appendChild(document.createTextNode(t.headingText));DOM_a.href="javascript:void(null);";DOM_a.title=t.headingText;DOM_a.onclick=this.navClick;DOM_a.tabview=this;DOM_a.tabviewIndex=i;if(this.addLinkId&&this.linkIdFormat){aId=this.linkIdFormat;aId=aId.replace(/<tabviewid>/gi,this.id);aId=aId.replace(/<tabnumberzero>/gi,i);aId=aId.replace(/<tabnumberone>/gi,i+1);aId=aId.replace(/<tabtitle>/gi,t.headingText.replace(/[^a-zA-Z0-9\-]/gi,''));DOM_a.id=aId}DOM_li.appendChild(DOM_a);DOM_ul.appendChild(DOM_li)}e.insertBefore(DOM_ul,e.firstChild);e.className=e.className.replace(this.REclassMain,this.classMainLive);this.tabShow(defaultTab);if(typeof this.onLoad=='function'){this.onLoad({tabview:this})}return this};tabviewObj.prototype.navClick=function(event){var rVal,a,self,tabviewIndex,onClickArgs;a=this;if(!a.tabview){return false}self=a.tabview;tabviewIndex=a.tabviewIndex;a.blur();if(typeof self.onClick=='function'){onClickArgs={'tabview':self,'index':tabviewIndex,'event':event};if(!event){onClickArgs.event=window.event}rVal=self.onClick(onClickArgs);if(rVal===false){return false}}self.tabShow(tabviewIndex);return false};tabviewObj.prototype.tabHideAll=function(){var i;for(i=0;i<this.tabs.length;i++){this.tabHide(i)}};tabviewObj.prototype.tabHide=function(tabviewIndex){var div;if(!this.tabs[tabviewIndex]){return false}div=this.tabs[tabviewIndex].div;if(!div.className.match(this.REclassTabHide)){div.className+=' '+this.classTabHide}this.navClearActive(tabviewIndex);return this};tabviewObj.prototype.tabShow=function(tabviewIndex){var div;if(!this.tabs[tabviewIndex]){return false}this.tabHideAll();div=this.tabs[tabviewIndex].div;div.className=div.className.replace(this.REclassTabHide,'');this.navSetActive(tabviewIndex);if(typeof this.onTabDisplay=='function'){this.onTabDisplay({'tabview':this,'index':tabviewIndex})}return this};tabviewObj.prototype.navSetActive=function(tabviewIndex){this.tabs[tabviewIndex].li.className=this.classNavActive;return this};tabviewObj.prototype.navClearActive=function(tabviewIndex){this.tabs[tabviewIndex].li.className='';return this};function tabviewAutomatic(tabviewArgs){var tempObj,divs,i;if(!tabviewArgs){tabviewArgs={}}tempObj=new tabviewObj(tabviewArgs);divs=document.getElementsByTagName("div");for(i=0;i<divs.length;i++){if(divs[i].className&&divs[i].className.match(tempObj.REclassMain)){tabviewArgs.div=divs[i];divs[i].tabview=new tabviewObj(tabviewArgs)}}return this}function tabviewAutomaticOnLoad(tabviewArgs){var oldOnLoad;if(!tabviewArgs){tabviewArgs={}}oldOnLoad=window.onload;if(typeof window.onload!='function'){window.onload=function(){tabviewAutomatic(tabviewArgs)}}else{window.onload=function(){oldOnLoad();tabviewAutomatic(tabviewArgs)}}}if(typeof tabviewOptions=='undefined'){tabviewAutomaticOnLoad()}else{if(!tabviewOptions['manualStartup']){tabviewAutomaticOnLoad(tabviewOptions)}}
//]]>
</script>

Step 6. Finally, look for this line:

<div class='column-right-inner'>

Or if you use an old template of Blogger, search this line:

<div id='sidebar-wrapper'>

Step 7. Paste below one of these two lines, this code:

<div class='tabview'>
<b:section class='tabviewtab' id='Tab1' maxwidgets='1'/>
<b:section class='tabviewtab' id='Tab2' maxwidgets='1'/>
<b:section class='tabviewtab' id='Tab3' maxwidgets='1'/>
</div>

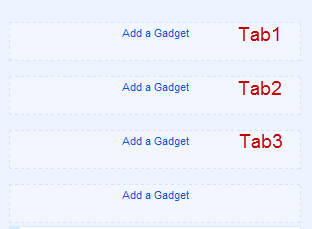
Step 8. Save changes, and go to Layout and there you will see the new areas to add gadgets.

Tabbed Navigation Widget

You just have to click on Add a Gadget to add the gadget to the tab that corresponds, or drag a gadget you already have to that section.

If you want to add more tabs, then just add before the last </div> a line like this:

<b:section class='tabviewtab' id='Tab4' maxwidgets='1'/>

Note that each line you add should have a different ID, for example Tab5, Tab6, etc..

You can add multiple tabs, just repeat the last step and likewise remember to change the name of the IDs.

Remember that if your sidebar is too narrow, then you should not put a lot of tabs, or tab titles that are very long.
You should also note that this gadget does not speed up the loading speed of the blog, is only to group gadgets into one, even, depending on the blog-may take a while to load the tabview.